Tuesday, September 21, 2010

KITCHEN HELPERS...
things we love to use....and make our life in the kitchen that so much easier.
Do we stop and think of how easy they make life for us - and
do i stop and think how much harder my Grandmother had it?


I think i am right is saying that we all have those *kitchen helpers* in a cupboard, sitting on our bench or tucked away in a cupboard that just make cooking/caking and baking so much easier.

KA - yes, he makes life so much easier when caking - from fluffy up those egg whites to stiff peeks -  to creaming that unsalted butter and castor sugar.
Plug him in - turn him on and he just beats and whips and paddles away - only to happy to assist me - whether for five 8 inch round cakes - or combining a single batch of cupcakes for the next fund raising stall.
Yes, this white shiny beast surely does make my life easier....


KA - sitting quietly............ until next i need him.


Dash - Pinch and Smidgen ...funny little names - but i can't count how many times i have reached for these little treasures over the years.
A little bundle of spoons that my DS spied in one of those *must have* kitchen shops...
He wondered how his Mother had never aquired a set of these  - how did you get buy without them all these years, he laughed as he handed me the tiny gift wrapped bundle. They only measure 3 1/2 inches from head to toe - loll.
Unbelievable i said - now my list of measuring equipement is complete - as i proudly hung them on the magnetic strip that holds all my good knives and metal measuring spoons.

Now when  a recipe actually calls for a *dash of that* and a *smigden of this* - i can do it to perfection...
Over the years they have become a topic of conversation amongst my kitchen friends -
Who could have thought that something so tiny - could cause so much laughter.

Introducing  Dash - Pinch and Smidgen ....


The New Kid on the Bench -  For some Months now i have been wanting one of these smaller gadgets. Yes, i have the *Mother Ship* version - but sometimes it just doesn't seem worth it - coaxing her from the bottom shelf only to process 80 grams of pistachio nuts.
Made many a phone call - trudged many a mall seeking this new white addition to my kitchen helpers - only to e told ....Sorry Madam, we are sold out - Sorry Madam, we can't keep enough stock....perhaps Madam can come back in 2 weeks.
Try placing an orer for one - you get the *pffffftttt, Madam really wants to place an order for something that small"?
And even then there would be no guarantee that i would ge the white one - *Madam might get a black one *

So it was with some rolling of the eyes when DH suggested last Thursday night that we just try Kmart...you just never know.
I was soooo over looking for one - but followed him into Kmart...what would the harm be?

Can you imagine my joy when he turned and smiled at me, pointing to the box - the one and only box, sitting all alone on the shelf - and white at that.
ITS MINE i said ....................... ALL MINE.
I carefully pulled the tape away and after digging through all the cardboard cut outs - there it was - indeed - it was white - not a black one disguised in a white box.
Stuffing everything back into the box i was up off that floor and quick sticks down to the smiling faced boy at counter 4.

I know - hard to believe - That someone (me) could be so very happy finding a smaller version of the Mother Ship.......but i was..........walking one foot off the ground all the way through the shopping center and back to the car.
Couldn't wait to get home, wash, dry and plug this baby in..............lollll

Affectionally called Stick and Bowl.... best thing - the rubber non skid mats that prevent him from sliding all over the bench when in use - also become lids when he is finished sticking and bowling.

And the beaker is not your average 600ml like others ... oh noooo,  but 1000ml.
And the Bowl - not just 2 cups ........ but 4 cups........... Brillante i say. as seen in snaps below.


M
------------

Friday, September 17, 2010

FRUIT CAKES...Mini Heart Shaped.


                            It is now the second week into September - and i have been thinking that it is
                                           time to start making my Fruit Cakes for Christmas.

Over time i have been asked how do i make my fruit cakes and the methods used... so i thought i would incorporate as tutorial to go along with my photos.


                                                               So, off we go.....

                       First i shall make 16 mini heart shape ones - so as to give my fellow CWA Branch
                       Members for Christmas Gifts


    After gathering all my fruits and slithered almonds - i set about cutting everything up into small   portions..............everything needs to be small as the cakes are small and nothing worse  than cutting a small cake and a huge piece of apricot falls out and leaves a gapping hole.......
                                horrors....perish the thought ....................


                          After the cutting and chopping - i then pour over the Brandy.
                              With gloved hands i then proceed to mix it through thoroughly -
                                     making sure everything  is  moist from the Brandy.
                          This done, i then cover with a few layers of Glad Wrap (cling film)
                                                     and leave for 4 weeks minimum.
                      That way i am ensuring that the fruit is plump (plump fruit is happy fruit)
                                             and the Brandy has been totally absorbed.


                                   Four weeks pass..................And so i continue with the next steps.
                                          I weigh and sift out my flour and spices into one bowl


                                                        Crack 7 eggs into another bowl.


Lightly whisk

Set bowl of whisked eggs to one side for now.


Next, into mixing bowl i place the softened butter,  brown sugar,
 treacle and plum jam.

Beat until creamed


Take combined bowl of Flour and spices and mix into bowl of Brandied fruits.
Ensuring that all fruit is coated evenly.


Making sure that you *bring* the fruit from the bottom of the bowl
to the top - thus encorporating all the excess liquid as well.
This photo shows  better coverage after doing this.


Next, (and this is where i put on 2 pairs of food safe grade tight fitting gloves - as i find i get a better distribution of the creamed mix)
Gradually add the creamed mixture in with the floured fruit and nuts.
Again, remembering to bring the fruit from the bottom of the bowl to the top.

This photo shows - after first mix.


This photo shows after mixing some more and bring floured fruit from bottom of bowl.
See how it doesn't look so pale and gooey - is that how you spell *gooey*?
lollll


And after a good five minutes of mixing - your fruit should look evenly coated.


Now, at this point i should mention that for these little heart shaped cakes - i wanted them to be as tall as possible - soooooo, i filled my little tins to the brim.
Horrors i hear you say - but there was a method to my madness...indeed there was.

By doing this i knew they would rise up and of course spill over the edge - HOWEVER - i also knew that i could with serrated knife - shave off the excess - that way ensuing that i had no crispy tops or edges.....yes peoples - at times i do *think ahead*
*wink*


Just thought i would pop some little pictures of one of the  hearts with its liner for you to see..
Sometimes it good to have a *visual*


So after arranging all the little hearts in their right postions - and placing the liners inside of each little heart - i set to filling them


And an arial view - loll


Might i add that at this point these are the best they are going to look until they have had their little *heads* chopped off - as they do rise - and overflowwwwwww

Into the oven we goooo.
On lowest shelf/rack
Oven pre heated to 200C - then as soon as cakes go into Oven - i turn the temp down to 150C
I set my oven timer for 30 minutes - then once that goes off - i turn the tray 180degrees to ensure even cooking.


The picture below shows them rising after 30 minutes of being in my oven.


Besides this tray of heart cakes - i also have enough mixture for 2 x 5 inch round cake tins.
Which i shall bake when hearts are cooked.


With the hearts safely tucked away in the oven i now begin to tidy up my kitchen - and turn the kettle on for that coffee i am craving...


Kitchen all cleaned - well earned coffee had - and fast forward an hour and 20 mins
and the hearts are cooked - removed from oven and left to completely cool on cake rack...did i remember to take a photo at this stage - NOOOO, I DID NOT.  :(

Let me say that the 16 little hearts and one round in the middle looked like a huge mishaped cake- lolll
Remembering, that was the plan -


Moving on after that hiccup ........... sorry.

I now , with trusty serrated knife start shaving tops...
This can be done two ways -
1 - leave all little tins in place and slowly work your way from one side to the other


OR
2 - as i did

Take each little heart out of the pan and do it.
I found this method to be more time consuming - but much easier.


Just a word of warning - very sharp serrated knives DO slice through food safe gloves
:( :( :(
and altho i didn't cut myself - one can see where the knife had been.


 i digress ...... so continuing on......

Just thought i would show you one little heart - all done...
with little liner still around it - and two  a la natural.


So now we have a rather messy looking pan - HOWEVER, we do have little fruit cake hearts of a good height all levelled and sitting pretty...

After levelling them i just give a gentle press down with th palm of my gloved hand - to ensure that all fruits are not sticking up


Now, usually i would wrap my larger fruit cakes in baking paper first - then two layers of glad wrap cling film...
However - because these little babies have a pointy end and a rounded end i don't want to damage that... otherwise i won't be able to get my fondant nice and sharp/rounded around the cakes.
Soooo, i have only wraped them in glad cling film.
Gently bringing the film around the point and again at the back where the rounded area is.


So, here are - all wrapped and in our Cake Tin ready to be tucked away in the bottom of the Pantry until November - when i shall bring them out - give them a light brush over with some Brandy - and then start decorating them.


And that ladies and gentlemen concludes this long winded - drawn out tutorial of how i, M prep, make and bake my fruit cakes.

They are well worth the effort and time that goes into making them.

They freeze extremely well - i have frozen them for up to 4 Months.
When i wish to defrost them... i remove from the freezer, leave them on the bench top overnight still wrapped in their layers.
By the next morning they are ready to be given a light brush of either Apricot Syrup or a light brush of Brandy.


 Apricot Syrup
1/4 cup of apricot Jam
1/4 cup of water

Stir together in small saucpan
Bring to a slow boil - allow to cool then transfer into a sterilized jar - may be kept in fridge for a Month.


Enjoy


FYI - These are the Mini Pans i use.-


M
----------


Monday, September 13, 2010

PISTACHIO MACARONS


Excellant - Mrs LP & Mr BP are coming for afternoon tea on Sunday.
Its been a few Months since we have seen them - as we had been East for the Sisters Birthday and they  have not long returned from their trip, driving through SA, NT and then back down the West Coast to home.
From their phone call they had a wondeful trip and loved everywhere they went and all that they saw.
It will be lovely to sit with them again and hear more of their adventures.

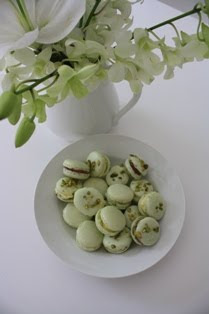
Something pretty and mourish to put on my favourite cake stand that D gave me - its so pretty and being white (D knows i love white) will  make them look even better...yes, pale green macarons on my pretty white cake stand it shall be.
Pistachios - yes, that will go lovely with the pale green.

Might try a new recipe .............can't hurt .................................can it ????


Shall seperate the eggs tonight and let them *age* over night......perfect.


Fast forward to early Sunday morning...................phone call from Mrs LP-
Mr BP was taken to hospital - not well - not well at all.........oh dear.

Feeling rather sad - am i really in the mood now to make these little pale green delights?


Yes, i will - might help if i keep busy.


Fast forward to Sunday early pm.
Phone Hospital to ask how Mr BP is.
Good news.......................Mr BP is allowed visitors.


I have a *bright idea* ...........
We shall take some PM's on a small plate to the Hosptital for Mrs LP - i am thinkng she could do with something to cheer her up - and perhaps Mr BP might be allowed to have just one...................yes, thats a good *bright idea*.


PM's made - and i have sprinkled some crushed Pistachios on some - others are just in their natural state (looking rather naked next to the ones that have been sprinkled)
Oh well - variety is good ............ so they say ......not too sure who they are - but will stay with that thought.


Some quick snaps before we head out the door.....


Very happy to see Mr BP sitting up - a glow to his face and a smile as we walked into his room.
We will await your results and keep nothing but good healthy thoughts for you.

Mrs LP had gone home - a very long and worrying morning and afternoon for her.
A well earned sleep is what was called for.


Little plate of PM's i left for her - we shall speak again very soon.


Fast Forward.
Kind words came down the line fom Mrs LP - it makes me smile to think that the little plate of pale green delights cheered her up....


you are so very welcome my Friend

xx


M
--------


Thursday, September 9, 2010

MICHAELS 21st BIRTHDAY


J phoned, asking if i could make Michaels's 21st Birthday Cake.
Indeed.

After some discussion we decided on something Red, White and Black - as those three colours would reflect his pride and joy - his Holden.

Thus i set about thinking that Holden colours are Red and White.
Michaels car is Red
Tyers are Black.
Hence the design.
Also added to the Cake is an Explosion - using Black Wires.
With his name embossed into the covered Cake board.


Three Choclate Mud Cakes - One cake being made with Morello Cherries.
When all three cakes were torted - i interchanged the layers so as the Cherry Flavour would be throughout the constructed Cake.


Each Layer filled with a Cherry Dark Chocolate Ganache...and then covered in the same.


Besides the Cake - there will be some platters of other small Table Treats......these will be made in the morning - (and photos added soon)
Chocolate Cake Donuts dipped in Red Chocolate...
Dark Chocolate Cake Balls - dipped in Red Chocolate...
and
Red Vodka Jelly Shots.


J arrived at Midday with her beutiful Daughter Miss H.
Both were thrilled with cake - and also the white platters of treats i had made for them.
We ooooed and arrrred and had some laughs - such lovely people they are.
And i was ever so thrilled to recieve a lovely colourful bunch of flowers from them - to say *thankyou*
see below

Photos below of .......
Platter of Raspberry and Port Wine Vodka Jelly Shots -
Platter of Strawberry Jelly Cakes filled with Chocolate Cream -
Platter of Chocolate Donuts dipped in Black Chocolate -
Platter of Cherry Cake Balls covered in Red Chocolate.
and
Platter of mini cupcases filled with Red Jaffas.


The beautiful colourful Flowers that J gave me in appreciation.


M
------------------